In this article, I am sharing my workflow that I use to produce my timelapse videos. I don’t pretend to have the best workflow ever, but this workflow works and provides exellent results. By the time I improved it and optimized it. At the end of the article you will be able to create a time-lapse video across 3 important steps:
- Definition
- The preparation
- The shoot
- The post-production
The good news is that the most important thing is not the gear, but I would say the preparation and location you are going to.
Please note that I inserted a few links, those links are not affiliated links, the products mention is in this tutorial because there are reliable and efficient.
1. What’s a timelapse?
Quote from the definition in Wikipedia:
Time-lapse photography is a technique whereby the frequency at which film frames are captured (the frame rate) is much lower than that used to view the sequence. When played at normal speed, time appears to be moving faster and thus lapsing. For example, an image of a scene may be captured once every second, then played back at 30 frames per second; the result is an apparent 30 times speed increase.
Here’s an example of a timelapse I shot:
2. The preparation
To create a timelapse video you will need some indispensable tools. I have listed the indispensables to develop a professional timelapse clip.
The Gear
A DSLR Camera
A DSLR Camera is a plus for a couple of reasons. First, you’ll be able to shoot using the RAW format, which means you can edit and modify more easily the pictures you took. The RAW has the advantage to let you change during post editing the white balance. Moreover, it offers a better dynamic range between highlights (i.e., clouds) and shadows of your image (i.e., tree).
I personally shoot with a Sony A7RII, it’s a professional camera, but even an entry-level DSLR can do the job decently.
Price for an entry-level camera $400. It can be found cheaper used on eBay for example.
Maybe you don’t spend hundreds of dollars for different reasons. Well even if a DSLR is a plus, the good news is that’s possible to produce great timelapse with a compact camera.
The Norwegian timelapse photographer Morten Rustad (Check his website here) made a great video about making a timelapse with a cheap camera.
A wide angle lens
I own a couple of lenses starting at 12mm and finishing at 200mm. I recently analyzed my Lightroom catalog. I filtered my pictures by metadata and I noticed that I was using more than 80% of the time a wide angle lens.
If have a limited budget, I would say that using an 18-55mm is a good fit for timelapse photography. Even if it’s not the sharpest lens ever, keep in mind that when you shoot with an entry Canon t7i. The pictures you get will be in 6000 x 4000 pixels, which mean 6K.
Once you share, your timelapse online people will open play on social media in 480 or 720p. At the end of the day, most the people won’t notice that this was shot with an entry-level camera.
A Tripod
A tripod is indispensable to make a timelapse. Indeed you have the take a series of at least 250/300 pictures with the same framing. Therefore, your tripod must be steady enough. Prices start at $50 and go up to $1000 and much more.
I would say that you can get a decent tripod for about $150.
A remote
Not necessary with of all the cameras, some of them have an interval mode.
The remote will give the order to take a picture at a constant interval, so no need to press the shot button 300 times manually.
For $10 you can get a reliable remote.
A fast memory card
I don’t any have any particular recommendation, just make sure the memory card is fast enough to write a picture per 2 seconds while timelapsing.
I would say take a leat a memory card that can write at least at 90mb/s.
Softwares
Adobe Lightroom
It’s the reference for timelapse adjustments. With this software, you will edit your pictures, adjust the contrast, the exposure, white balance, saturation etc. The demo version lets you edit up to 400 images which are enough for a 10 seconds timelapse clip.
Lightroom costs $9/month with Photoshop.
See more info here.
LR Timelapse
It’s a plugin to allows you to adjust and to set the same exposure on all your pictures in order to remove the flicker effect which is the unsteadily of exposure between multiple shots.
The demo version lets you edit up to 400 images which is enough for a 10 seconds timelapse clip.
Get more info here.
Adobe After Effects
Once you have edited your series of pictures, you’ll use this software to create the video clip from the pictures.
This software can be expensive. You can also use free programs such as timelapse assembler, iMovie.
Total of the gear
| DSLR | $500 |
| TRIPOD | $150 |
| REMOTE | $10 |
Virtual Preparation
If you want to capture a great video with the best conditions as possible, I only thing I can say is ‘The preparation is key!” I mean with a good preparation you arrive at the spot much more confident and your chances of success are much higher. You can arrive in a rush and plan nothing and be lucky, but based on my experience it prepare well, you get good results.
Check the location
Do you know what you want to shoot? How to? What kind of framing?
The first I would recommend is to go on photography websites such as 500px, Flickr and make a research by keywords about the location of the location you want to shoot.
Once you get some images matching with your initial expectation, check the GPS location on in the picture description.
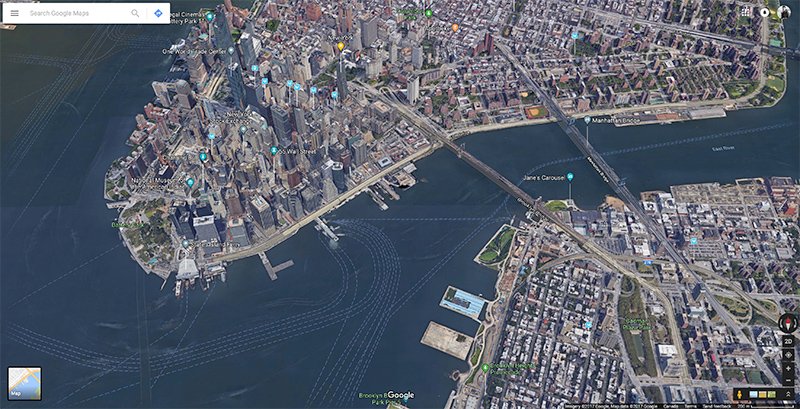
Then go to Google Maps to check how to access to the spot, some spots in the urban environment can be harder to access than I initially could thing because of non-pedestrian roads, transit etc.

Check the Forecasts
Ok now, you know where to go and how to, you need to know when. Check the weather forecast to decide the day but not only. You need to determine which moment of the day will be the best, what time is the sunrise or sunset etc.
You also need to need the sun or moon axes, in order to define what your framing will be, if you want to include or nor the sun or maybe the moonrise in your composition.
There are 2 apps that I personally use and recommend:
The Photographer’s Ephemeris: The web version is free and delivers excellent information. There’s also paid mobile version available for iPhone/Android users.
http://app.photoephemeris.com/
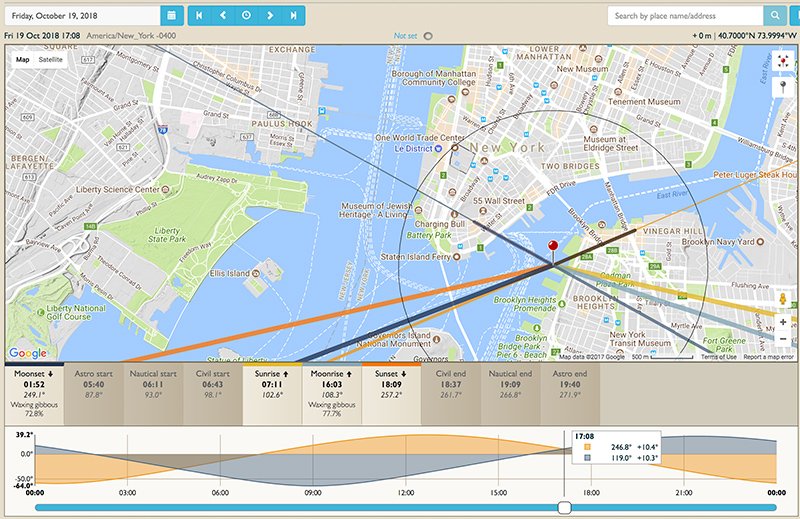
PhotoPills is a mobile app that offers the same feature as The Photographer’s Ephemeris but has the advantage to include a virtual reality feature to see in real time the sun/moon movements.
Prepare your gear
Even if it would seem obvious, make sure your lens is cleaned, battery charged, and also the sensor cleaned. With time-lapse videos having a cleaned sensor is extremely important in contrary to photography where you can easily remove a spot. In time-lapse photography because of the motion of the elements removing a spot/dust on a video is tough to do.
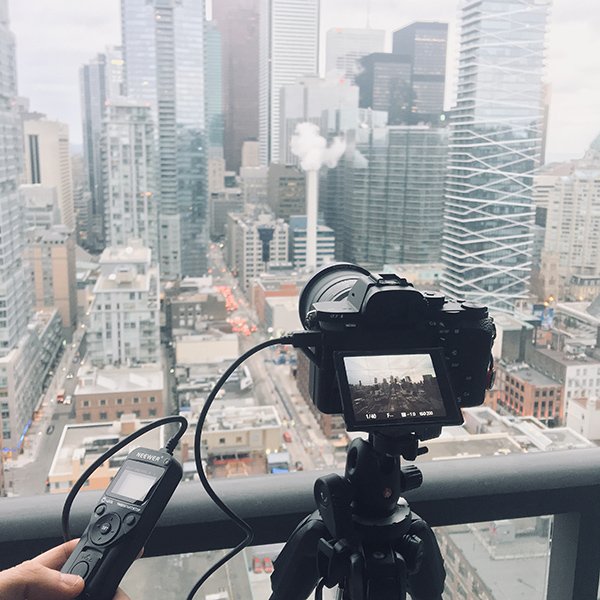
3. The shoot
Set up
I recommend arriving 30/45 minutes before the beginning of the shot in order to get the best results as possible and try different framings. Once arrived, unfold your tripod, set your camera, go to the interval mode.
See the checklist that sums up all you need:
| Battery charged | Location is checked |
| Intervalometer | Weather is ok |
| Cleaned lens | You know what will be your framing |
| Tripod | |
| Memory card is empty |
Define the number of photographs to shoot
Keep in mind that to make time-lapse video you’ll need depending on the framerate (number of frames per seconds) you choose between 24 and 30 frames per seconds
See below how many videos you need:
| Framerate | Frames shot | Clip length |
| 25 | 300 | 12 seconds |
| 30 | 300 | 10 seconds |
Define the interval of time between each shot
A timelapse is just an accelerated vision of reality, looks around you. Depending on how fast the elements around you are moving (clouds, cars, sun, etc.) you will need to decide the interval. I will give you some example to provide a global idea, but those examples can be different once on site depending on your conditions.
Sunset timelapse:
The length of the day to night transition can last for about 1H30 if you want your clip to show tremendously the transition shooting a picture every 15 seconds is enough.
1H30 = 90 minutes
a shot every 15 seconds = 4 shots per minute
so at the end you will shoot 270 pictures and based on a framerate of 25fps (frame per second), you will get a video lasting almost 11 seconds which can be enough.
Example of a Day to Night timelapse:
Daytime timelapse:
Clouds are moving, just look to the sky I see by your own eyes how fast the clouds are moving between 2 seconds. If you can notice a difference, therefore 2 seconds are good.
Set your interval to 2 seconds and a few minutes after depending on the length you decided your clip will be shot.
Camera settings
I think there’s not a perfect way. I recommend 2 options:
Shoot manual:
Take different test shots, and once your picture is properly exposed, start taking pictures. I would recommend this technic when the conditions don’t change like a daytime cloudy day.
You can shoot a sunset timelapse in manual mode, but you have to set a large interval between each shot in order to adjust your settings based on the decreasing amount of light.
Shoot with the aperture priority mode:
You can leave your camera with this mode. Because with this mode your camera will calculate what’s the best shutter speed between each picture, you might get clips with different exposure, but it’s very easy to fix during the post edits with LR Timelapse.
Whatever the technic you use I also recommend to leave the iso at the minimum because you are using the steady tripod, that way will avoid the noise on your images.
Also, I advise locking the autofocus in order to save time to your camera between each shot. How to do that? Just make the focus before you start, and they switch to manual focus. Just make sure you don’t touch the lens while you are shooting.
A Minimum shutter speed
Movies are filmed using long shutter speed. Open a movie file, and press pause, you will notice some motion blur on the moving elements of the scene. This is because the shutter speed is not too short. The cameraman used the following rule
For a 23.976 frame per second it’s filming at 1/50, and for 30fps he’s using 1/60. But why using these particular shutter speeds? It’s to smooth the footage. If you had to watch 2 5 seconds clips, one filmed at 1/800 and another one filmed at 1/50. It’s likely you will prefer the one filmed at 1/50. And why because it’s smoother. So How to apply this rule in timelapse well If you are shooting 1 picture / second, The best will be to shoot for 0.8 seconds. The idea is the same as in video the camera sensor should be filming with the fewer paused time as possible.
How is it possible to film at 0.8 seconds all the time? The light condition can require less time or more time to get an image properly exposed.
That’s true that’s the reason the movies are filmed neutral density filters, and those filters can be used in timelapse photography.
If you don’t have one, it’s not a big deal, but if you get the best of the best, it’s the way to to do. Devil is in the details.
4. The post editing
You’ve shot your sequence, and now it’s time to edit your skills and make them a beautiful video clip using the following workflow. There’s a lot of to say; I won’t go in depth for each step, the idea of just to give a global idea of the workflow.
Adobe Lightroom
Import your pictures into Lightroom, edit one picture by adding a bit more contrast the contrast, sharpen the image, saturation, etc.
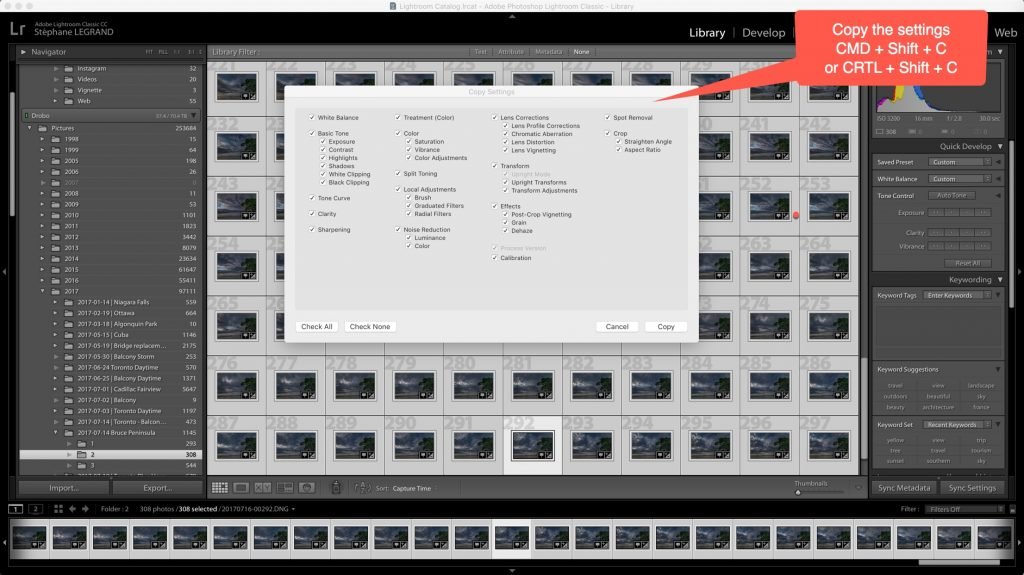
Then apply the same settings into all your pictures by pasting the correction to all the files. Once done export the files.
Example of the batch editing on one of my clip shot in New York City. To do apply your corrections, then hit CRTL + C or CMD C to copy the develop settings, go back to your library select all your images and hit CTRL + V or CMD V.
LR Timelapse
Go to the menu and select save to metadata.
Go to back to LR Timelapse
Click on reload, click auto transition, click save
What was the purpose of this step? Just to synchronize the settings to all the images between the 2 keyframes, also it settings creating a smooth transition between the values of keyframe 1 and keyframe 2.
Have a look at your clip preview, by clicking visual preview.
When you look at the pink curve on the preview (which represents the exposure) you might see different. This means you have Flickr, but don’t worry it’s easy to remove just remove defliker and hot save.

The software will load in a few minutes to recalculate the right exposures without any flicker.
Once done hit play, if you still see some Flickr then hit again of the Flickr removal tool. When you are happy with the result go back to Lightroom.
Select all your images and read from metadata. When the loading is finished, you can select all your images and right click and select Export.
After Effects
This is the final step, Adobe after effects will transform your pictures to video clip.
Go to file import > Select your series of pictures you just exported (make sure you clicked the checkbox file sequence)
Now your images are imported. You can see them here:
Drag and drop to them the movie icon to create a new composition.
If you right click on the icon, you can adjust the settings, framing, frame rate, etc.
Now it’s time to adjust the video.
Is your video a bit shaky? Go to filter and select warp stabilizer, just wait a few minutes during the analyse.
Do you want to crop your composition? Go the bottom click on the arrow and adjust the crop by changing the scale, you can also adjust the position and the rotation.
You clip didn’t look super smooth because the shutter speed was too fast? Go to filters and add the pixel motion blur
Once you are satisfied go to the menu> add to render

At the bottom of the page, you can select the video format I recommend Apple 422 or Photo Jpeg select your resolution.
And hit render,
Click render and you’re done!
5. Conclusion
Shooting a timelapse sequence is not hard, but it requires some practice and some fails, to get a great clip I tend to think that the shooting is 50% of the job and the post editing 50%. Therefore my best advice to shot, and ask for feedback from you. So now what you need to do is take your gears out!
I want to thank you for your time, as I said I would publish more information about making a timelapse on my website.